How to Stop Recording Then Start Again Audacity
This folio provides a detailed description of various ways of controlling recording in Audacity, including how to command where and which track you tape in and keyboard shortcut commands.
- If you have non made whatever recordings in Audacity earlier, you may desire to endeavour the the Audacity tutorial "Your First Recording" which includes step by step details of how to gear up up your equipment too.
| | When making recordings, detail critical recordings, you should consider shutting down all other applications giving Audacity sole use of the computer. This can help to avoid skips, small dropouts, and ticks in your recordings. And on Mac that means fully Quitting them not just closing them, every bit otherwise Mac volition leave them open consuming computer resources. |
Contents
- Setting upwardly
- Recording on the same runway
- Recording a new runway
- Continuing recording in a new track
- Recording a region in a new rail
- Recording for a specific length of time
- Maximum recording length
- Punch and Coil recording (for correcting errors)
- Arming Brazenness for recording
- Dropouts (pocket-sized skips) in your recording
- Hardware influence on Recording Quality
Setting up
- Connect your input source to your estimator and verify that you are getting sound into your computer using your computer'due south sound input command panel or the custom mixer application that came with your particular audio interface.
- Tell Audacity which source you take selected to tape from, use the Device Toolbar or Devices Preferences.
- Gear up the recording level using the input slider on the Mixer Toolbar while watching the indications in the Recording Meter. Try to aim for a maximum peak of effectually \xe2\x80\x936.0 dB (or 0.5 if y'all have your meters set to linear rather than dB). Tip: enlarging the Meter Toolbars by clicking and dragging them helps with this task.
To listen to what you are recording y'all have two options.
- If you computer's audio command panel supports sending the audio input to the computer's audio output and then make this setting there.
- If that is not possible, click on so that it is checked.
Alternatively, if you are using an external audio interface or mixer y'all may be able to monitor the signal direct from that device.
For farther information on setting upwardly meet: Audacity Setup and Configuration.
Detailed pace-by-stride instructions for setting up for recording are provided in the Your First Recording and the Copying tapes, LPs or MiniDiscs tutorials.
| | Equally shortly as you have made a recording it is strongly recommended to information technology immediately to WAV or AIFF (ideally to an external drive) as a condom copy before you start editing the project. |
Recording on the same track
This append recording is the default recording behavior in Audacity.
When you lot click the Tape button ![]() on Transport Toolbar (or utilize the shortcut R ) Brazenness will record at the finish of the currently selected, or only, track, or volition create a new rails if you lot currently take no tracks.
on Transport Toolbar (or utilize the shortcut R ) Brazenness will record at the finish of the currently selected, or only, track, or volition create a new rails if you lot currently take no tracks.
This requires that the number of recording channels (mono or stereo) matches the selected rail. In other cases, it appends the first rails (or adjacent tracks) that support the number of channels being recorded.
When recording like this, at the end of an existing recording, Brazenness will place a Clip line at the junction between the two recordings (as in the image beneath) to aid you lot in separating them later if required. You lot can remove the clip line, if not required, only by clicking on it joining the ii clips.
-
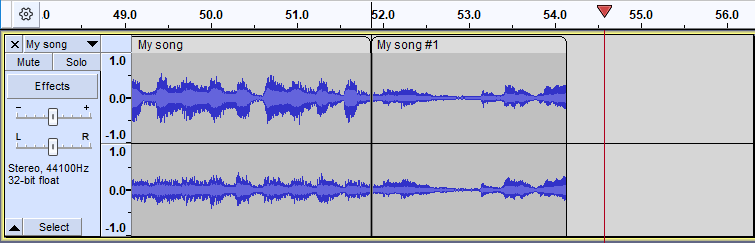
- Stereo rails with appended recording showing a Split line at the finish of the previous recording, here shown at 51.v seconds
If you have your cursor positioned beyond the stop of the existing rails and and so printing Record, Brazenness will start the recording from that cursor position and back-fill to the finish of the existing audio with silence.
Recording stereo into mono, or mono into stereo
You cannot suspend record a mono recording to a stereo track. If you try to do this Audacity will create a new mono track for y'all and the recording volition be a pseudo appended recording, with the new mono audio offset time being the end of the stereo audio (or the cursor position if that is set across the end of the stereo sound).
Similarly y'all cannot append record a stereo track into a mono runway. Audacity will similarly create a new stereo rail for the recording. However, if you have ii mono tracks and try to suspend record in stereo, Audacity volition identify ane stereo channel in each mono channel. If yous take many mono tracks, you can select two of them and record the left aqueduct in the offset and the correct channel into the 2d.
Recording a new track
If you agree the button downwardly the Record push button in Send Toolbar will temporarily change to ![]() . Then clicking on this modified Record push button, or using the shortcut Shift + R volition crusade Audacity to create a new track and begin recording on that runway from the current cursor position (or from the left border of a region on the Timeline).
. Then clicking on this modified Record push button, or using the shortcut Shift + R volition crusade Audacity to create a new track and begin recording on that runway from the current cursor position (or from the left border of a region on the Timeline).
-
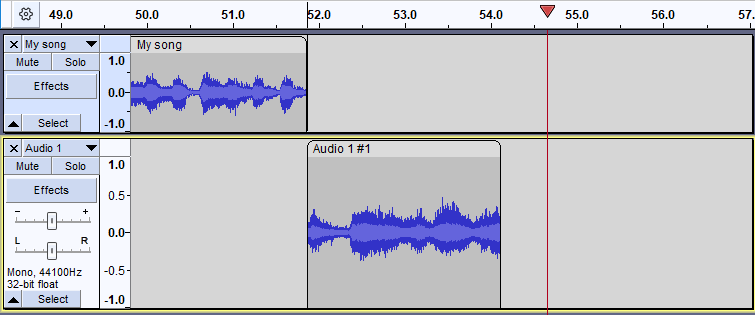
- Mono track with new track existence recording on a new tack below starting at the end of the previous recording (as that is where the cursor was left)
There is no need to create a new track before starting to record. If yous desire recording to get-go from the beginning of the project, click the "Skip to Start" button ![]() on Transport Toolbar or press the Home shortcut. Printing the Stop button
on Transport Toolbar or press the Home shortcut. Printing the Stop button ![]() (or use its shortcut Space) to Terminate the recording.
(or use its shortcut Space) to Terminate the recording.
Continuing recording in a new track
Instead of stopping the recording with the Stop button ![]() or Space, you can stop the recording with the Play / End and Set Cursor shortcut X. When you record over again using the Shift key modifier to get the
or Space, you can stop the recording with the Play / End and Set Cursor shortcut X. When you record over again using the Shift key modifier to get the ![]() record below, recording will starting time in a new rail at the stop-position of the track above.
record below, recording will starting time in a new rail at the stop-position of the track above.
Recording a region in a new runway
If there is no Timeline region or option, Audacity records until you lot terminate the recording.
To record merely the Timeline region in a new runway, select the region in whatsoever of the existing tracks or the Timeline - run across Recording for a specific time below. There is no need for the runway containing the region to exist selected.
Recording for a specific length of time
- Drag-select a region in an existing sound track - or cull the time range to be recorded in Selection Toolbar.
- And so hold down Shift printing the button
 (or use the shortcut Shift + R ) to record in a new rails for the duration of the selection you made.
-

- Mono recording on a new track beneath for a specific length of fourth dimension
-

- Recording for a specific length of time completed
If there is a selection that is entirely across the end of all selected tracks, then the recording volition outset at the beginning of the selection and stop at the end of the selection.
| | Ensure that yous utilize the Shift modified Record to make the recording. If you use the ordinary Record then the recording will append record to the end of the runway and ignore the pick. Or if you accept an empty project and utilise the Option Toolbar to make a choice and so, with evidently Record, Audacity will create a new track starting at the selection commencement time simply it will carry on past the finish of the selection until you Cease information technology. |
Maximum recording length
Brazenness does not restrict the maximum recording length beyond the applied limitation that recording takes space on your drive so you can simply record while the drive nonetheless has infinite available.
When y'all start to record, Audacity shows a "Disk space remains for recording" bulletin in the Status Bar at bottom left of the Brazenness window giving the current recording time available.
With default Audacity settings, stereo recording takes ane.2 GB of space per hour.
After recording you volition still need space to export the recording as an audio file for your computer. Editing the recording earlier consign takes actress space. Each edit of a region requires as much extra disk space every bit was required to originally record that section.
To get more recording fourth dimension:
- Delete your old files and folders (especially your erstwhile Audacity Project files when you accept finished with them)
- Select an culling drive that has more space in the Directories Preferences (but do not record to an external USB or FireWire disk considering recording needs disk access to be as fast as possible)
- Record in mono instead of stereo (settable at "Recording Channels" in Device Toolbar or in Devices Preferences)
- Set the "Default Sample Format" in Quality Preferences to sixteen-bit instead of 32-bit (this is a good pick for a "quick recording" which you export at one time without editing).
Meet Recording length for more than details.
Punch and Roll recording
- This enables you to to correct errors easily during the grade of a recording session.
- You tin stop, support over a error, and continue recording, resulting in one track that eliminates the errors and is properly timed, without the use of cutting, pasting, and clip-moving commands, or mixing of multiple tracks.
- You can do crude editing as you lot go, with minimal intermission of your performance (saving you the trouble and extra work of having to come back later and make the edits).
For details please see Dial and Roll Record
Arming Audacity for recording
Arming Audacity just means that you are preparing it for recording, readying it without the recording actually starting
To arm Audacity:
- Click the Pause button
 or its shortcut P
 - Click the Record button
 or use the shortcut R
Audacity is at present armed and gear up to record. Note that monitoring in the Recording Meter volition have get active, monitoring your input bespeak:
Once yous are set up to start recording just click the Suspension button ![]() once again, or its shortcut P (or the Record button
once again, or its shortcut P (or the Record button ![]() or its shortcut R) and recording will commence immediately.
or its shortcut R) and recording will commence immediately.
Dropouts (small skips) in your recording
Audacity now has dropout detection which is enabled past default. This is controlled from a setting in Recording Preferences called "Notice dropouts".
Dropouts may be acquired by a disk bulldoze that cannot go on up with the recording. This tin happen, for example, with a slow USB or network bulldoze, or if antivirus software is slowing writing to disk, or if other activity on the computer is slowing the computer down.
You may have been experiencing dropouts and non noticing, they are not discernible while recording simply on playback. And so Audacity could now announced much worse than previous releases, when in actual fact Audacity is simply alerting y'all to a problem that you previously would not have been enlightened of - or might have put down to a bad microphone or poor recording technique.
When this setting is "on" (default setting) Audacity will notice dropouts (brief gaps in the recording) and will insert zeroes into the recording to keep the other skilful parts synchronized.
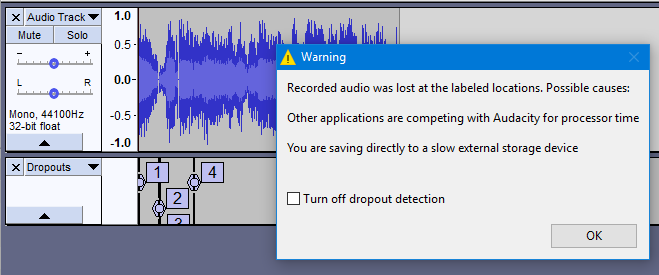
When recording stops, a message box alerts the user and a characterization rails, chosen "Dropouts", is added showing the lost parts, labeled with consecutive numbers. This will exist an additional new label track if yous already have a label track or tracks.
| |
|
Hardware influence on Recording Quality
The Audacity Wiki has some useful information on how your hardware can touch on your recording quality.
barringtonsampe1980.blogspot.com
Source: https://manual.audacityteam.org/man/recording.html
0 Response to "How to Stop Recording Then Start Again Audacity"
Postar um comentário